Schedule Change Requests
Agents can submit requests for schedule changes if they have been set-up to do so. Agents who are not set-up to do so will not see the request button on their screens.
What do you want to do?
Tasks in this Topic Include:
- Make a Schedule Change Request Overview
- Make a Schedule Change Request - Regular Exception
- Schedule Change Request Fields
- Submit Anyways
- Make a Schedule Change Request - Mid-day Negative Exception
- Make a Schedule Change Request - Mid-day Positive Exception
- Make a Schedule Change Request - Additional Hours
- Make a Bulk Schedule Change Request
Related Tasks:
- My Schedule
- My Schedule Adherence
- My Schedule Changes
- Schedules for Bidding
- My Bids
- Schedule Swap Requests
- My Alerts
- Change Password
Make a Schedule Change Request Overview
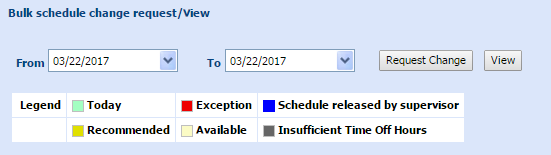
The Agent Portal indicates recommended time off days to agents via the Interactive Schedule Calendar.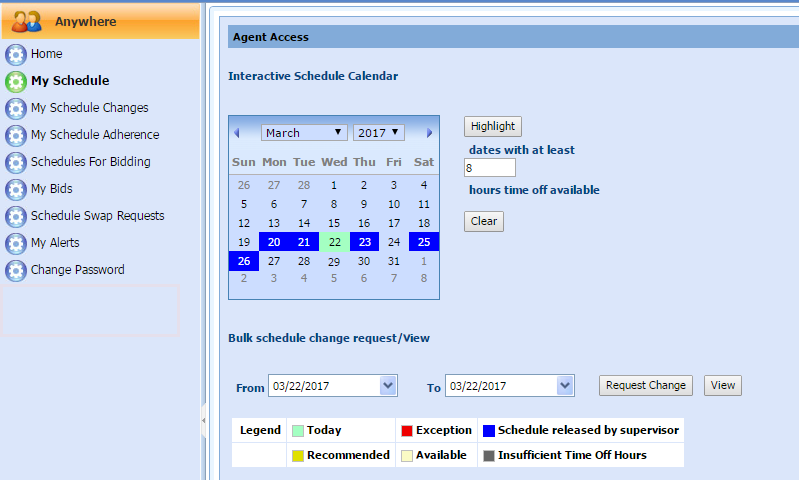
The Interactive Schedule Calendar displays the interactive calendar of the current month.
- The Blue color indicates the days on which the agent has a schedule.
- The Red color indicates the days on which the agent has Exceptions. These could be Regular, Mid-day plus (+), or Mid-day minus (-) exceptions.
- The Darker yellow color indicates days recommended for exception requests.
- The Lighter yellow indicates days that are available for scheduling.
- The White color indicates dates the agent is not scheduled.
- The Grey color indicates dates where there are insufficient hours in an Exception Pool.
- The Bulk schedule change request/View allows for the submission and viewing of change requests that span multiple days.
Make a Schedule Change Request - Regular Exception
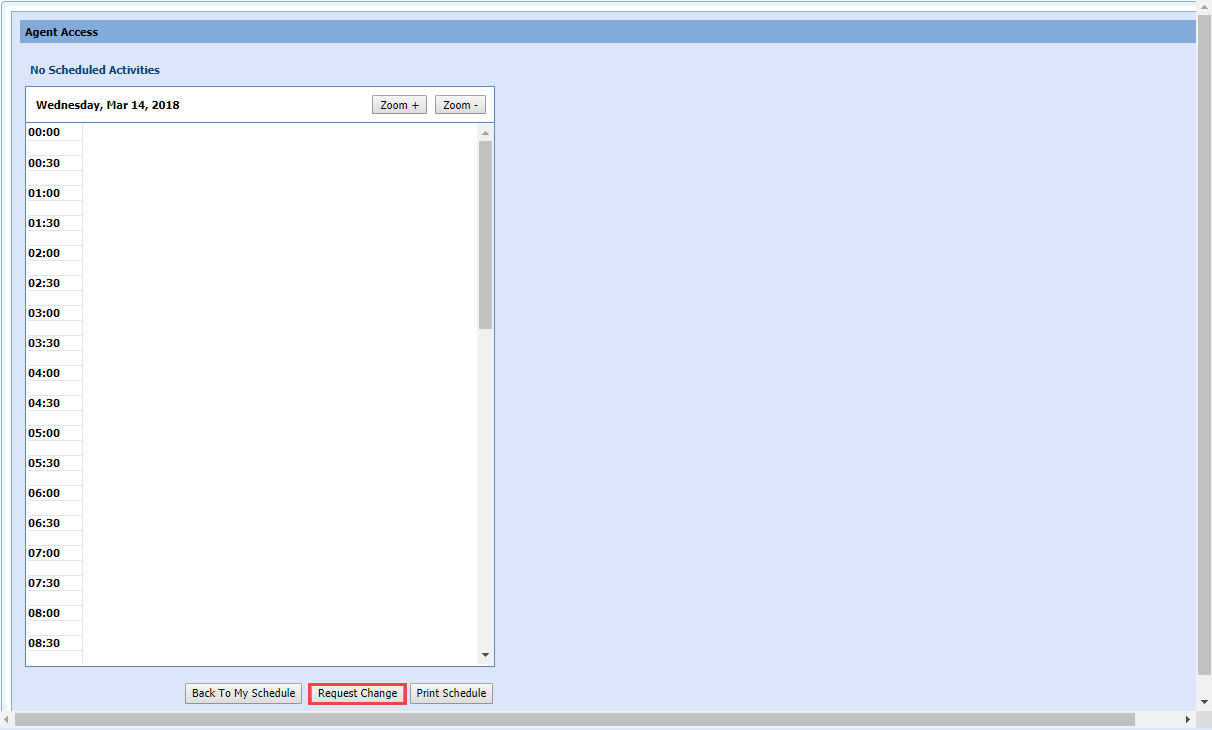
To make a regular exception request for a single day:
- Select my schedule in the left navigation menu.
- Double click on the date where you want to submit a request.
- Select Request
Change.
Schedule Change Request Fields
| Schedule Change Requests Field | Description |
|---|---|
|
Select Exception Availability Change Regular Mid-Day |
|
| Select Supervisor |
Agent's supervisor name |
| Date | Opens the calendar picker tool |
| To Date | Opens the calendar picker tool |
| Min. # of Hours | 0-24 |
| Max # of Hours | 0-24 |
| Earliest Start | - to 23 hours; - to 45 mins. |
| Latest Start | - to 23 hours; - to 45 mins. |
| Pref. Start Time | - to 23 hours; - to 45 mins. |
| Latest End | - to 23 hours; - to 45 mins. |
| Time Off Hours | Number of hours the agent is requesting |
| Personal Hour Cost | |
| Enter specific comments/remarks for the supervisor to see | Use to enter comments or notes to the supervisor |
| Back to My Schedule | Returns to the My Schedule view |
| Clear | Clears the entries |
| Save | Saves the entries |
- Choose the Select Exception type from the drop-down menu.
- Select Regular in the exception type drop-down menu.
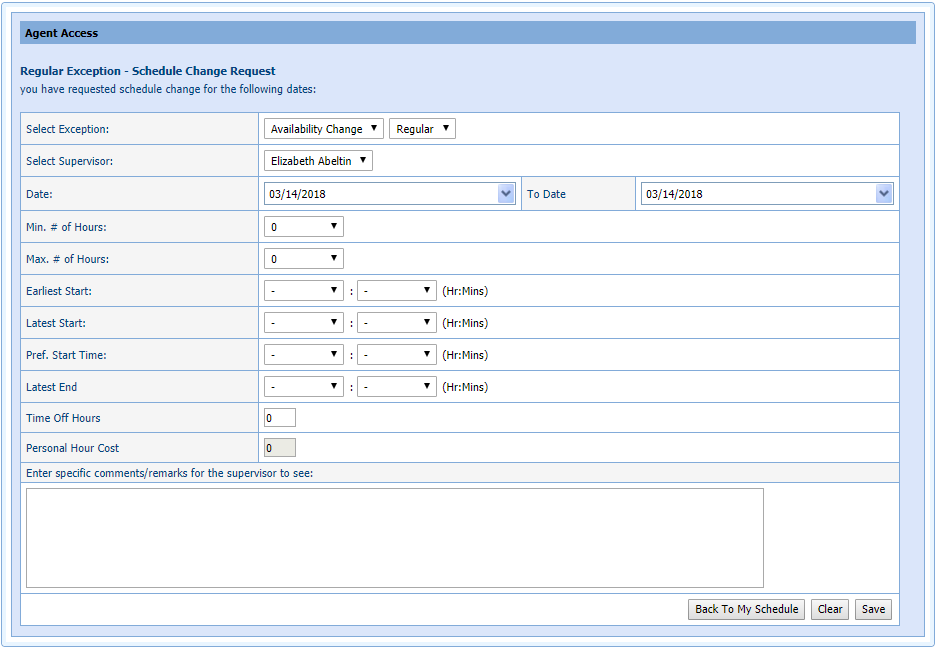
- Choose the Select Supervisor from the drop-down menu.
- Enter the Time Off Hours.
- Enter the Personal Hour Cost for PTO requests.
- Enter any specific comments/remarks for the Supervisor to see.
- Select Save.
- You will be presented with one of the following screens:
- Submit Anyways to submit the request to the supervisor who makes the final judgment on whether to award the time off or not.
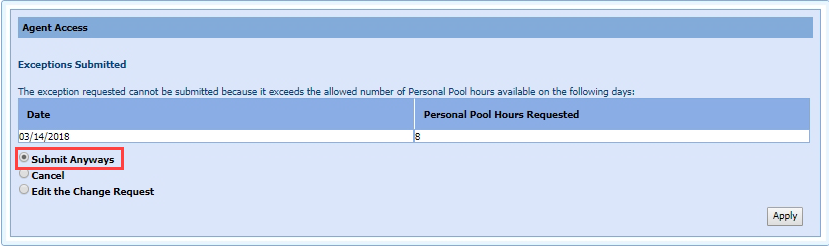
- Cancel to cancel the request.
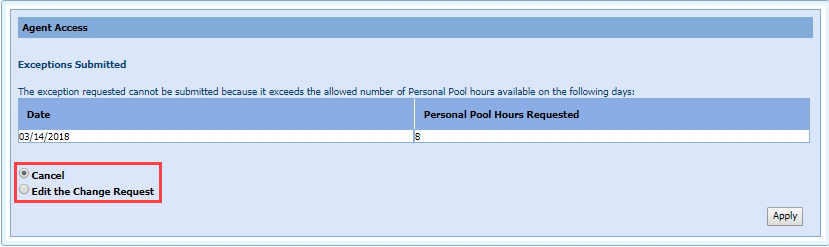
- Edit the Change Request to revise the request.
- Submit Anyways to submit the request to the supervisor who makes the final judgment on whether to award the time off or not.
-
Click Apply to process the request.

Submit Anyways
Administrators can disable the submission of schedule change requests when agents do not have Time Off Hours, or Personal Hours available. The Submit Anyways radio option is removed from the dialog when the criteria is not met.
Make a Schedule Change Request - Mid-day Negative Exception
In this example, Agent Hank Aaron makes a request to his supervisor for 2 hours off during his shift to visit the doctor. This will be Mid-day - (negative) exception because it will be time the agent is not available.
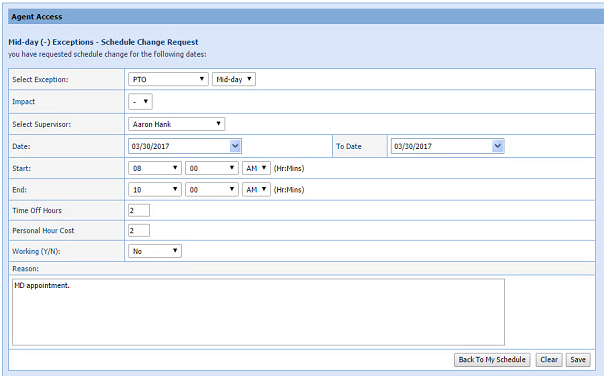
- Select PTO (or the appropriate selection from your customized list), and Mid-day from the Select Exception drop-down menus.
- Select - (minus) from the Impact drop-down menu.
- Select the supervisor to submit the request to from the Select Supervisor drop-down menu.
- Select the Date from the calendar pickers.
- Select the Start and End times from the drop-down menus.
- Select the amount of vacation time to use for this exception from the Vacation Hrs. drop-down menu.
- Select whether or not you are working during this exception from the Working (Y/N) drop-down menu (for example, training is a situation where you are away from phone work, but still working; whereas a doctor appointment would be a not working situation).
- Enter a reason into the Reason text box to let the supervisor know the details of the request.
- Select Save.
- Select a radio button option.
- Click Apply.
Make a Schedule Change Request - Mid-day Positive Exception
In this example agent Hand Aaron is offering to work some overtime (2 hours at the end of his shift). a mid-day positive exception is entered.
- Select
the exception type from the drop-down menu (in this example – select Overtime).
- Verify that Mid-day is selected in the drop-down menu.
- Select + (plus) in the Impact drop-down menu.
- Select the Supervisor to submit the request to from the Select Supervisor drop-down menu.
- Select the Date and To Date from the Calendar pickers.
- Enter the Hours as appropriate.
- Select the Before/After setting form the drop-down menu to add the requested hours before or after the scheduled times.
- Enter the Personal Hours Cost (as appropriate).
- Enter a comment for the supervisor to see in the text box.
- Select Save.
- Select a radio button option.
- Click Apply.
Make a Schedule Change Request - Additional Hours
An agent can submit a request for additional hours to be added to their schedule.
- Select my schedule in the left navigation menu or double click on a date in the Interactive Schedule Calendar.
- Double click the date you wish to work the additional hours (Dates you already are scheduled, or dates you are not scheduled).
- Select Request Change to open the Schedule Change Request window.
- Select Overtime in the Select Exception drop-down menu.
- Select Regular, orMid-dayas appropriate.
- Choose the Select Supervisor to submit the Change Request to from the drop-down menu, and then enter the other requested details.
In this example, the agent is asking for an additional shift on the date shown. They are saying that they are available anywhere from 4 to 10 hours that day, starting anywhere from 8:00 AM to 10:00 AM, and ending as late as 9:00 PM.
Make a Bulk Schedule Change Request
Agents can submit requests for schedule changes that span multiple days.
- Select my schedule in the left navigation menu.
- In the Bulk schedule change request/view window, select the From and To dates from the calendar picker.
- Select Request
Change.
The Schedule Change Request window is displayed: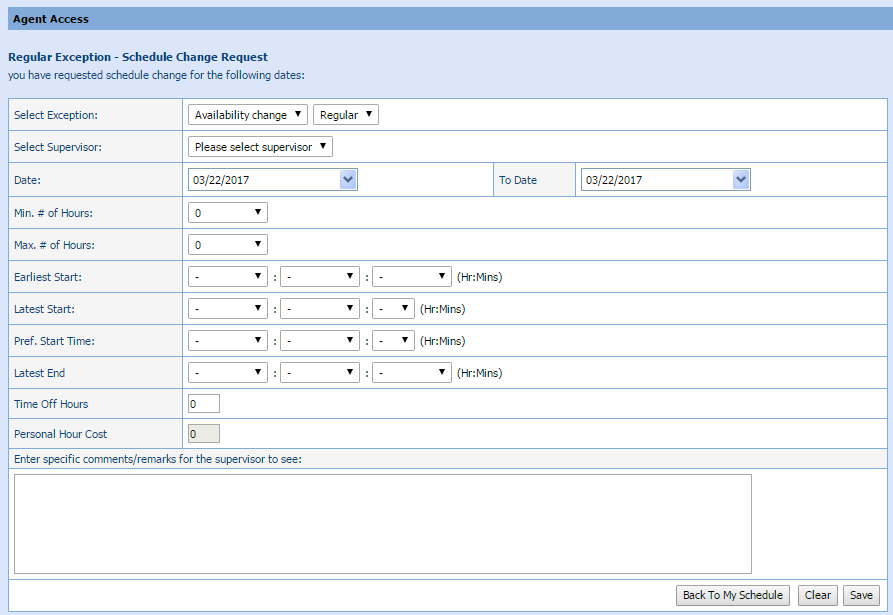
- Fill in the form for the type of exception you are requesting as described above.
- Select Save.
- Select a radio button option.
- Click Apply.